Install Pavers
Ready to install pavers?
When installing an interlocking concrete-paver system 90 percent of the work involves preparation of the subsurface. In fact, you will do most of the work on the paver project; like: planning and designing, breaking concrete or whatever surface is there; then, excavating and preparing the base foundation before you lay one single paver stone.This guide will help you if you are planning on a do-it-yourself project.
Step 1: Planning
Start with a draw a diagram of the area you want to pave, noting any existing structures such as buildings, fences and other paved areas. Spray paint it's a great idea to start pre-marking
When you have determined the size and shape of the project, it's time to calculate how many pavers you will need. When working on a project without many curves, simply estimate the square footage of the space and add at least 5 percent. If your project has a lot of curves or a paver border, add 10 percent. Do not order more than 10 percent or will end up with a pile of stones that you don't really need.
Contact your local utility companies before you begin excavation. Stake out an area approximately 12" larger than the area to be paved. Plan to slope the paving away from the buildings in the direction of normal drainage.
Step 2: Excavating and Grading
Where there is only pedestrian traffic or around pools a base of 4"-5" of processed gravel is recommended. To achieve this, excavate 7"-9" to allow for base material, sand and pavers. Where there will be vehicular traffic a base of 7"-9" of processed gravel is recommended.
Step 3: Preparing the sub-grade
Compact the surface of the excavated soil with a plate compactor. In small areas a hand tamper may be sufficient. Continue removing any standing water, rocks, bad soil and any bad or rotten roots, because any bump or depression at any level will become extremely visible when the project is completed.
Even if the soil it's not clay, place a geotextile layer of Mirafi 500x - Lay the geotextile over the exposed soil and up the sides of the excavated area. This will provide incredible additional stability for the base rock foundation.
Step 4: Laying the crushed rock base
Use crushed rock for the base, the same material used for highways, also called class 2 or recycled concrete. The climate and type of soil under the base determine the thickness of this layer. Cold regions with fine clay or silt require a thicker base than well-drained soil in a warm climate. Make sure to slope the surface for water drainage. The slope should be 3/16" per foot. Install a level line across the area using a line level. On the stake that is at the end you want to slope towards, move the line down 3/16" for every foot of pavement. For example, if your pavement will be 8' long, move the string down 1". Measure the distance from the line to the base. The distance should be equal all along the line. If any areas need to be built up, do so with the base material. Compact the base using a mechanical plate compactor. For best results, work the compactor in a circular motion and go over all areas at least twice. If the road base is dry, moisten it with a garden hose, but don't saturate it before compaction.
Step 5: Installing the bedding sand
Before you can lay the pavers, a bed of sand must be prepared. You need to have in hand these essential tools: Rubber hammer, heavy-duty gloves, safety goggles, knee pads, and at least 2 PVC pipes. Start laying the bedding sand. It is recommended that you use concrete sand. Place two pieces of 1-inch PVC pipe used for spacing strips of wood or other suitable material, such as screed rails, parallel to one another and place them 6' to 8' apart down the area to be paved. Spread the bedding sand in between the two PVC pipes. Use a piece of 2 x 4 to smooth sand, making it level with the top of the pipes. Then remove the pipe conduits and fill in the voids left by the pipes. Note: Do not compact or walk on sand. Spread only as much sand as you can cover with pavers in one day. Any sand left overnight or longer can become uneven or wet which leads to an unleveled surface.
Step 6: Installing the concrete pavers
Starting in a 90° corner, lay the pavers in the pattern you have chosen. Work outwards keeping all joint lines straight. Use string lines pulled along joint lines and parallel to the edge restraints or, chalk lines snapped on the surface of the sand bed to keep the joint lines straight. Leave a 1/8" space between the pavers.
You may need to pull out and set additional strings to mark joint lines.
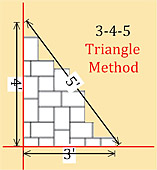
 Make sure that you have 90° corners at your starting point. You can do this by using the 3-4-5 triangle method. From the corner stake measure 3' across the base and 4' up the side. The diagonal line joining these two points should be 5'. If it is not, adjust the 4' side until the diagonal is exactly 5'.
Start by gently laying the pavers stones one by one and outward and tightly together in the appropriate laying pattern. If adjustment is needed use a screwdriver and hammer to move it into place. When necessary along the edges to cut pavers, use a masonry skill saw with a diamond blade or hammer and chisel or mechanical splitter for a perfect fit. Lay all the whole pavers in place before adding the cut pavers. Using the stakes, tie a string line from one end to another and measure over to your string line every few feet or move the string line to stay on track. When this is completed you will need to cut the edges to install the borders.
After you set all pavers, use the plate compactor again to vibrate and set the pavers into the bedding sand.
Step 7: Cutting Pavers
Measure and mark the pavers to be cut with a marking crayon. Use a straight board as a ruler and a PVC pipe for curved edges. A diamond blade wet saw, paver splitter or a hammer and chisel can be used to cut pavers. Keep edge stones to one-half paver or at least 2'' because if they are thinner than 1'' they will tend to crack with the minimum vibration.
Step 8: Restraining the pavers
Without edge restraints, pavers can shift, and the base can erode.
There are a few choices in order to secure the paver field. The number one, is that after you have cut the edge of the installed area, and everything is ready for the edge restraining. You will need to mix concrete and install pavers on the wet concrete (This is also called bond beam;) so when the concrete dries it will create a strong support to the center field; plus, this will be stronger than any other method and will add to your paving project an amazing stability and if its a driveway, a smart way to go is installing a 1/2 inch steel rebar (see diagram,) this will provide more stability to the concrete edging. Note: The wider the concrete beam is the stronger the edge will be.

Other methods of edge restraints are only to hold the concrete pavers and the base temporarily, and if you tend to place a heavy object near the edge, the edging will start moving and sinking down. Restraints can be made of steel, aluminum, precast concrete or plastic. Secure plastic or metal edge restraints in place with 12-inch spikes. For projects with several curves, you can cut the edging to follow bends in the shape of the project.
Step 9: Setting the filling sand
Sweep the surface to remove any debris. Spread masonry sand over the surface, sweeping it into the joints leaving surplus sand on the pavers. Do not use coarse sand, such as the kind used for the bedding of the pavers, unless you have installed permeable paver stones, which have big gaps, then you can use the same coarse sand used for bedding the pavers, but finer sand will fill joints faster. Just be careful what type of sand you use. Sand that is too fine will not provide for sufficient interlock. Filling sand is the final layer of the base for an interlocking concrete-paving system. Make sure that any sand you use is completely dry so that it fills the paver voids. When all the sand is swept over the paved area, compact the surface again, sweeping sand into the paver joints until they are full. Tamp the pavers down using the plate compactor. The excess sand on the pavers will cushion the surface and the vibration will assist in filling the joints. Spread more masonry sand if required. Make two or three passes at 90° to each other and re-sweep the surface. Sweep the remaining excess dry sand over the surface filling the joints. It is recommended that you use a Sand Locking product, which is an additive to keep the sand from moving around and provides longer lasting to the paver project and it also stops weeds from growing in between the pavers joints.
Step 10: Clean up
Finally, it is time to clean up the work site for debris and ready to use.
 If you plan on applying the sealer, you would need to wait until the surface is completely dry.